Engine, Fuel and Power Transmission Systems
Engine Compartment Access
You can access your vehicle’s powertrain by removing the seat. You may also need to raise the vehicle depending on your model.
Checking the Oil Level
Always check the engine oil when the engine is warm and the vehicle is parked on a level surface. To check the oil level remove the dipstick and wipe the oil off with a lint free cloth. Reinsert the dipstick into the engine and remove checking the oil level.
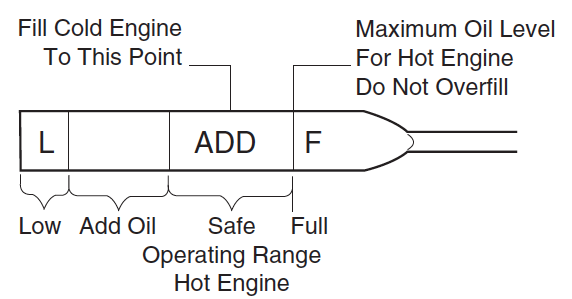
If the engine oil is low, add more engine oil until the level is within the ideal range.
Changing the Oil
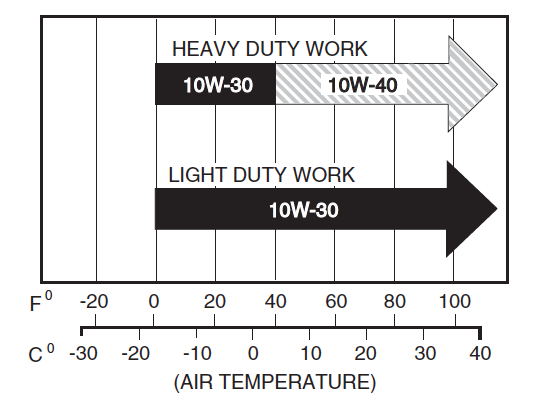
To get the best from your vehicle you should regularly change your engine oil. When your cart is brand new, replace the oil after 100 hours. After the first oil change you should replace the oil every 125 hours or every six-months, whichever comes first.
The majority of golf carts require 10W-30 engine oil initially then use 10W-40 after the first oil change.
To change the oil carry out the following:
- Secure the cart on a level surface from movement,
- Position a sump under the engine,
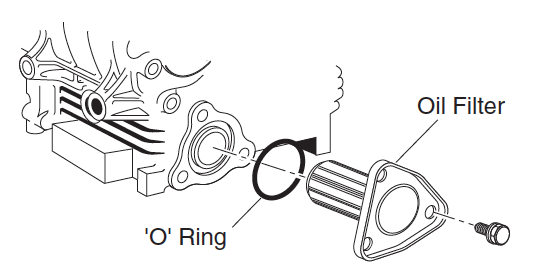
- Remove the oil filling cap,
- Remove the 3 bolts securing the oil filter,
- Allow the engine oil to drain into the sump,
- Fill the replacement oil filter with oil,
- Fit the replacement oil filter to the engine and secure the bolts,
- Refill the engine with oil. Total capacity is 1.4L,
- Refit the oil-filling cap, and
- Start the engine, shutdown and check your oil level.
AIR CLEANER INSPECTION/REPLACEMENT
The air cleaner is fitted to the engine and can be found by raising the seat of the cart.
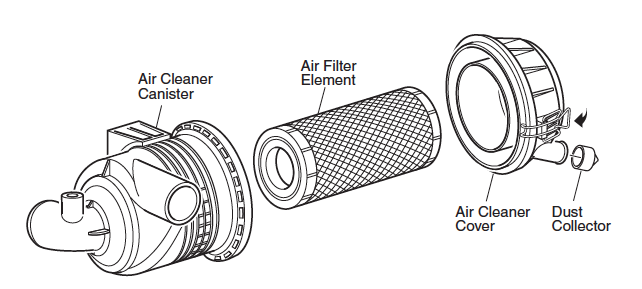
Give the cover, canister and dust cover a good clean and refit . Ensure the arrow is pointing upward and fasten the clips securely.
Cleaning the Air Filter Element
Should you find the air filter element in poor condition you should replace and refit the clips appropriately.
STARTER/GENERATOR BELT TENSION
When new you should check the belt tension after the first 15-20 hours of use. The belt should be set to 75-80lbs (34-36KGs). When replacing a belt always tighten to 90-110 lbs. (41-50KG) tension. Measure this by placing a feeler gauge half way between the pulleys.
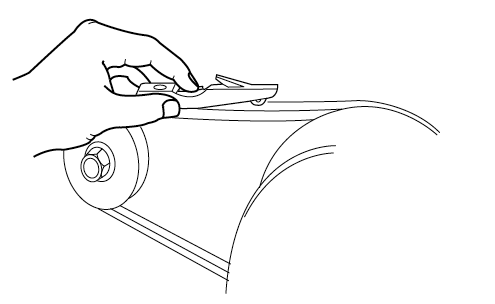
If you do not have a gauge you can depress the belt with your finger where you should see a maximum deflection of 3/8″ (10 mm) is Satisfactory. Please note that this method is not as accurate.
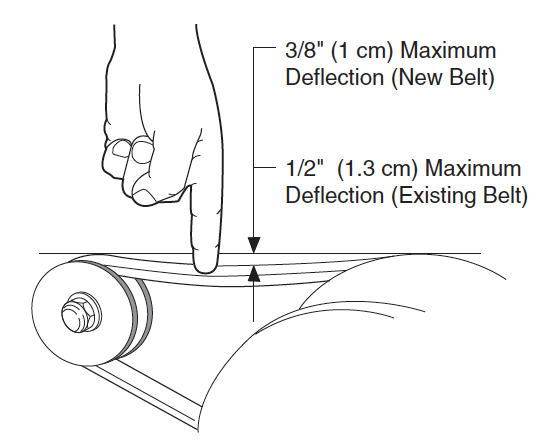
If you are tightening an existing belt, adjust belt to 75-80 lbs. (34-36 kg). The maximum deflection allowed is 1/2″ (13 mm).
Adjusting the Belt
To adjust the belt use a 3/4″ socket and opened ended spanner/wrench. Loosen the starter motors pivot bolt. Hold the lower nut with a 9/16” spanner/wrench and loosen the upper nut with another 9/16” spanner/wrench. You can then travel the lower nut up or down to adjust the belt tension. When achieved hold the lower nut and tighten the upper nut.
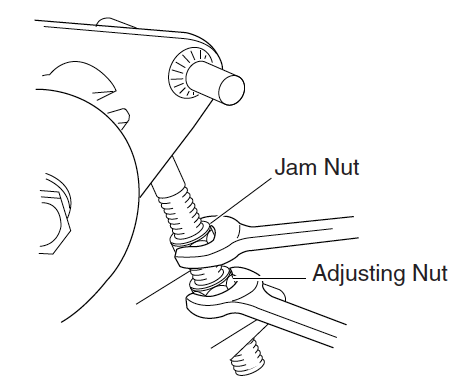
On completion tighten the pivot bolt of the starter motor.
COOLING SYSTEM CLEANING
You should clean the coolant system once per year. The reason for this is grass may accumulate within the internal shroud and fins causing a deterioration of the cooling system efficiency.
To clean ensure the engine is cold and pressure wash the cylinder head cooling fins. On completion you can dry with compressed air.
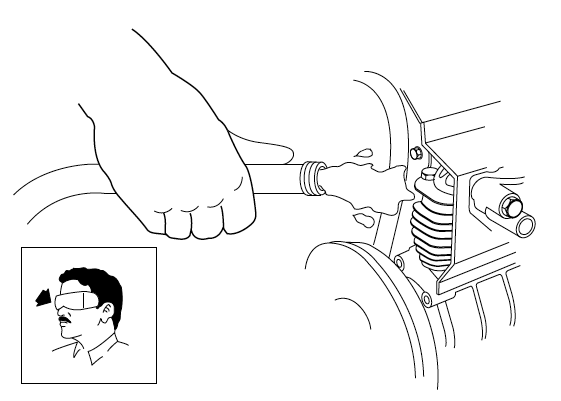
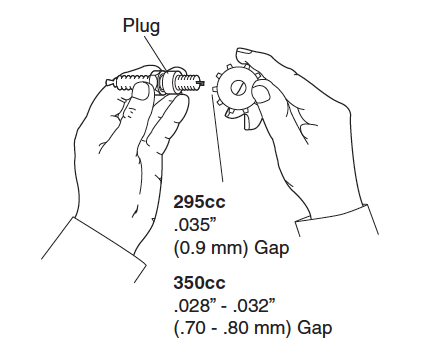
SPARK PLUGS
Remove the spark plugs every 250-300 hours or annual, whichever comes first. To remove the spark plugs use a 13/16″ spark plug wrench. Fit new spack plugs and tighten to 18 ft. lbs. (24 Nm).
FOUR CYCLE ENGINE
Engine Description
Your golf cart contains a 4-stoke (cycle) air cooled, 2 cylinder (in-line) overhead cam engine.
Engine Operation
Valve Adjustment
Each valve should be checked annually (250 hours) to ensure they remain adjusted correctly. Incorrectly adjusted valves can cause wear to the cams and rockers.
Furthermore your engine will perform poorly and clog up the spark plugs if the valves are not positioned correctly.
Adjustment Procedure
Your valve clearances can be set at the top of the engine. Always adjust these setting when the engine is cold. Annually remove the rocker cover and slide a 0.004” (0.10mm) feeler gauge (flat) between the valve rocker and the cam’s heel. The feeler should slide in and out with only some light resistance. Should the feeler be hard to slide or not insert at all, the valve is too tight and requires adjustment. Conversely if the feeler is too loose and the gap is too large, the valve is too loose and requires adjustment. To adjust loosen or tighten the adjuster nut using a straight head screwdriver. Check the gap with your feller gauge and readjust as necessary.
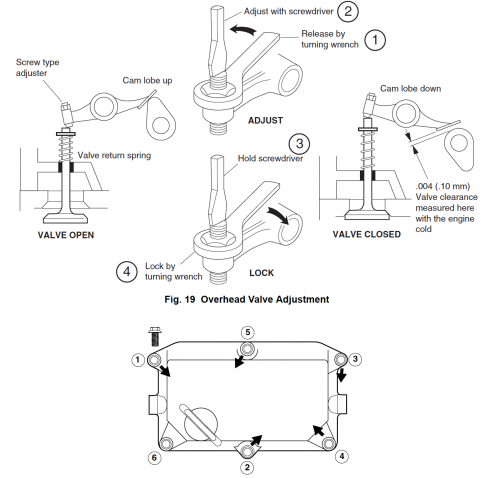
Manually rotate the engine to reposition the next valve for checking.
Rocker Cover Installation
Check the O-ring for any damage and replace if found. Reposition the rocker cover gasket within the housing groove and apply light oil. Install the rocker cover gasket and finger tighten the bolts. Sequence tighten the bolts to 60-65in.lbs. (7Nm) to ensure you do not distort the cover.
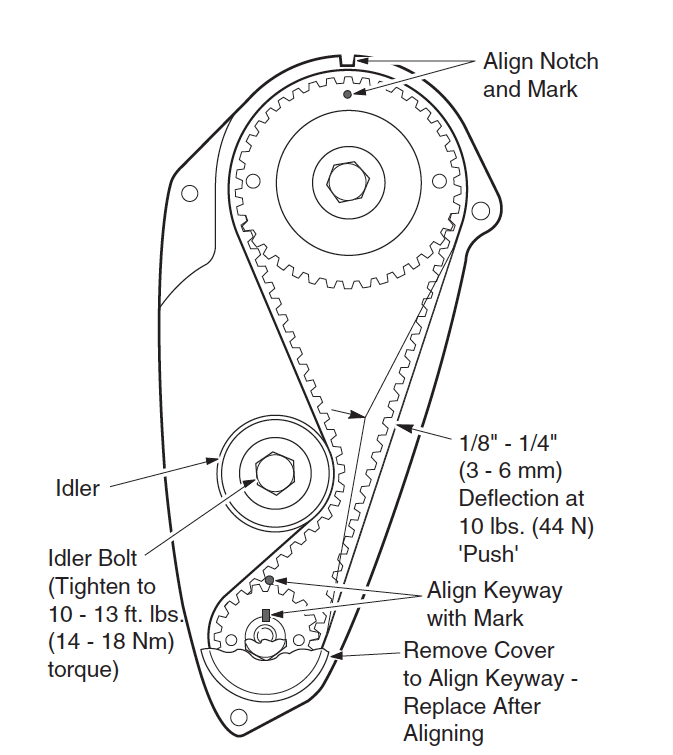
Timing Belt Adjustment/
Annually check the timing belt tension by removing the rubber plug in the timing belt cover. This allows access to the idler pulley bolt. Loosen the bolt with a ¼” spanner/wrench and manually rotate the engine one turn allowing the belt to tension. Adjust the idler adjustment nut to 10-13ft. lbs. (14-18Nm). Reinsert the rubber plug.
COMPRESSION TESTS
To conduct a quality compression test:
- Remove clutch belt,
- Remove air filter,
- Ensure battery is fully charged,
- Ensure starter belt has correct tension and is not worn causing slippage,
- Open choke fully and accelerator baffle plate,
- Ensure engine is warm,
- Removing one spark plug at a time fit your compression tester to the engine,
- Conduct a dry compression test by rotating the engine with the starter until the gauge pressure peaks,
- Record the gauge reading,
- Conduct a wet compression by pouring 1/2 ounce of 30-weight oil through the spark plug hole,
- Repeat the compression test,
- Record the gauge reading,
- Compare the dry compression test with the wet compression test results.
Note: Higher wet compression test results means poor ring sealing or a leaking cylinder head gasket. If both results are the same then you have an indication of valve sealing problems.
Your engine should increase 20lbs. above the rated PSI for an engine with seated rings. Compression readings that are 20lbs. below the rated PSI for an engine means poor cylinder sealing.
160 psi (1103 kPa):
New Engine
140 psi (965 kPa):
Good Compression
100 psi (690 kPa).
Engine has experienced many hours of use and is starting to wear to low compression. A top end overhaul should be considered for prolonged future use. Engine will start to burn lubricating oil and product black exhaust fumes with a bluish tinge.
50 – 60 psi (345 – 415 kPa).
Piston rings are in terrible condition or valves are leaking. Conduct a wet compression test. If compression increases to 10psi (70kPa) or more then the rings are in bad condition. If no increase in compression is experienced then the valves are leaking. If seal rings are in poor condition engine will be burning oil and producing black exhaust fumes with a bluish tinge.
ENGINE REMOVAL
Safety
- Isolate battery,
- Remove the fuel pump line and plug off.
Skid Plate Removal
To remove the skid plate cut the wire tie securing the shift cables and remove the 4 bolts securing the bottom engine plate.
Controls and Wiring
- Disconnect the wiring harness and cut the wire tie that holds the accerlator cable,
- Disconnect the choke cable and remove the push nut on the governor,
- Disconnect the fuel pump pulse line,
- Disconnect the engine’s ground strap,
- Slacken the starter motor and remove the starter belt,
- Disconnect the short control rod and short rod from the bellcrank and governor
Removing the Engine from the Vehicle
- Slacken the bolt holding the muffler to the engine frame
- Disconnect the 4 bolts that hold down the engine to the support casing.
- Raise the engine and clutch vertically with appropriate lift gear
DRIVE CLUTCH REMOVAL
- Disconnect the clutch bolt,
- Fit a lubricated clutch puller into the clutch and tighten 4 turns.
- Disconnect clutch with impact wrench
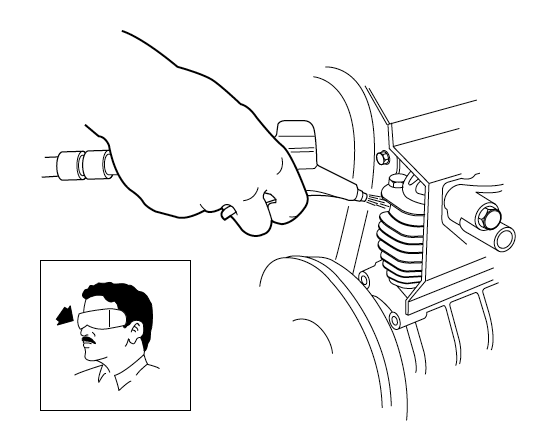
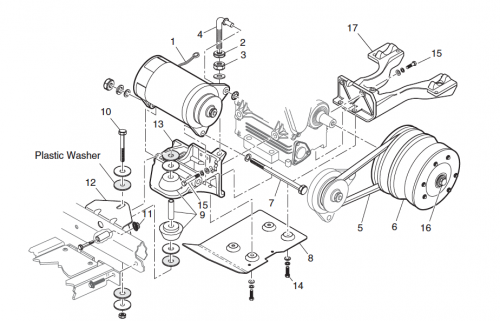
STARTER MOTOR REPLACEMENT
- Disconnect wiring from the starter motor,
- Slacken nut and adjustment nut and place the starter motor adjuster until starter belt is removed from clutch.
- Disconnect starter motor pivot bolt raise starter motor from the cart.
- Fit the starter motor pivot bolt loosely in place and fit a new starter belt,
- Fit nut securely and torque pivot bolt to 44-46 ft. lbs. (60-62 Nm)
- Fit wiring and torque the terminals firm in place.
- Reconnect battery.
ENGINE ISOLATION MOUNT REMOVAL
- Remove floormat and remove cover of accelerator switch enclosure,
- Place a jack under the engine skid plate and jack it up to remove load from the isolating mount,
- Disconnect the isolation mount bolt,
- Disconnect nuts that connect the isolation mount bracket to the cart’s frame,
- Disconnect the isolation mount bracket and pull apart the mount.
Engine Isolation Mount Installation
- Follow reverse order of “Engine Isolation Mount Removal,”
- When reconnecting the isolation bracket to the cart’s frame, torque the nuts to 21-25 ft. lbs. (28-34 Nm).
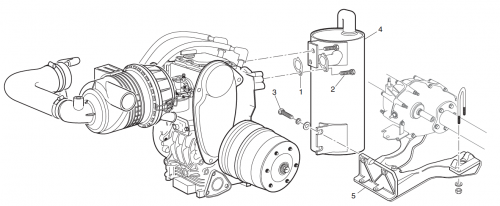
MUFFLER REMOVAL
- Disconnect the bolt that fits the muffler tothe engine frame,
- Disconnect the muffler to the manifold mounting bolts and remove the muffler by rotating it vertically through the engine’s compartment.
Muffler Installation
- Follow reverse order of “Muffler Removal,”
- Install a new gasket and torque the manifold bolts to 16-18ft. lbs. (22 – 24Nm).
- Torque the muffler to the engine frame to 10-12ft. lbs. (14-16Nm).